
Securely deploying to a server using CI/CD
Pushing web apps/sites to a private server
Hosting web apps using Vercel and the like can be useful; but what if you want to host something on a server you own?
The trend of deploying web applications and web sites to external hosts like Vercel has been rendered so simple, that most CI/CD setups are just a few lines of actual work. But what if you want to host something elsewhere?
If you’re like me and you have your own hosted website in current year, it can
be tedious having to scp or rsync files constantly, writing down the flags
so you make sure to always clean up old deployments. You want to be able to have
it taken care of through your usual CI/CD pipeline, but you need an SSH key
right? Where do you store it, in the repo?
Well, it’s easier than you might think.
First things first, I’ll be using a trimmed down version of my own github workflow for demonstration purposes, amend the relevant steps to fit your own setup. There are also a few other Github steps that might change as the UI changes; if you’re feeling extra impressive you could automate them using the API.
Below is a trimmed down template for building my site
name: Deployment demo
on:
  push:
    branches:
      - master
jobs:
  build:
    runs-on: ubuntu-latest
    steps:
      - uses: actions/checkout@v2

      - name: Install java
        uses: actions/setup-java@v3.12.0
        with:
          distribution: "temurin"
          java-version: "11.0.20+8"

      - name: Install clojure & bb
        uses: DeLaGuardo/setup-clojure@master
        with:
          cli: "1.11.1.1403"
          bb: 'latest'

      - name: Install deps
        run: yarn

      - name: Build
        run: bb build
Obviously this doesn’t handle any kind of deployment so we’re going to have to add that ourselves. Because I’m not an idiot (although this is debatable), I’ll be using variables for my information (server IP & private key).
Generate SSH key
If you want to generate a new SSH key (recommended, reduces the fallout of having a key compromised), execute the below commands
ssh-keygen -f /home/$USER/.ssh/github-deploy
Generating public/private rsa key pair.
Enter passphrase (empty for no passphrase):
Enter same passphrase again:
Your identification has been saved in /home/elken/.ssh/github-deploy.
Your public key has been saved in /home/elken/.ssh/github-deploy.pub.
The key fingerprint is:
SHA256:xyeTjhvNQLLAmuRFZFW91ay5/Fz0hFMbipcqvB1klNc elken@zenith
The key's randomart image is:
+---[RSA 2048]----+
|   .+.....  .o.  |
|   +      .o..oE.|
|  . + . . .oooooo|
| o + . + ..=o+o.o|
|  +   . S O.+. +.|
|         X *o   o|
|        o B .o . |
|         + .  o  |
|        .        |
+----[SHA256]-----+
You should ideally set a passphrase for this key to further reduce the fallout of having the key compromised. And obviously, this key I’ve generated has been long deleted.
Set the variables
Navigate to your repo’s project settings and under security, look for Secrets and Variables then Actions.
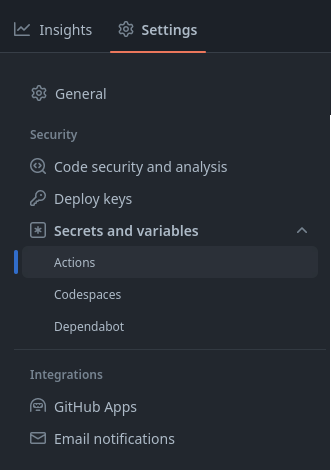
You’ll then want to use the table below to create a number of repository secrets. It’s up to you if you want to include all of the ones I include here, the only important one is the key and the host for privacy.
| Name | Value |
|---|---|
SSH_HOST | The IP/DNS name for the server you’re deploying to. If you’re using DNS, ensure it’s resolvable via the internet first |
SSH_KEY | The private key that you generated from the previous step /home/$USER/.ssh/github-deploy |
SSH_PORT | The port used for SSH on the machine you’re connecting to (default to 22 if you’re unsure) |
SSH_USER | The user you want to connect as. Most setups will probably have root disabled |
Again make sure that for simplicity these are defined under “Repository Secrets” not “Environment Secrets” (it’ll still work, just needs extra setup)
Adjust the CI file
The final step is to configure our yml file to connect and deploy to our server. Add the below lines to the bottom of the config (if you’re using your own, ensure these steps occur after all the building is done)
Essentially what we’re doing is pulling down our SSH key, creating a tunnel through SSH and running rsync with flags to ensure that any older deployments are cleaned up.
Replace <path-to-files> with the local path relative to the repository root of the files to upload and <path-on-server> to where on the server the files should live.
I’d recommend pointing to an empty folder on the server first if you already have something deployed, just to make sure it will in fact upload your changes.
      - name: Install SSH Key
        uses: shimataro/ssh-key-action@v2
        with:
          key: ${{ secrets.SSH_KEY }}
          known_hosts: unnecessary

      - name: Adding Known Hosts
        run: ssh-keyscan -p ${{ secrets.SSH_PORT }} -H ${{ secrets.SSH_HOST }} >> ~/.ssh/known_hosts

      - name: Deploy with rsync
        run: rsync -avz --delete -e "ssh -p ${{ secrets.SSH_PORT }}" <path-to-files> ${{ secrets.SSH_USER }}@${{ secrets.SSH_HOST }}:<path-on-server>
And that’s it!
Debug as needed, but for the most part you should be good to go.